The ‘Breakout-Goodbye Kiss’ Trade Strategy
A great trade set-up where risk can be kept quite minimal, there is a good probability of success and the pattern is fairly easy to spot. It takes a lot of patience though, and occasionally waiting for this pattern to develop means we will miss out on a great trade because our entry wasn’t triggered. On the flip side though, we avoid a plethora of bad trades.
1. Isolate a Price Range
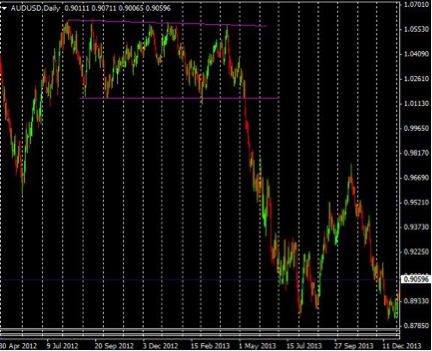
Isolate a price range on any time frame. The range should include several “price swings,” meaning the price is oscillating back and forth within a contained area. The swings don’t need to create the same highs or lows, although when this occurs the range is easier to spot. Figure 1 shows about as pretty of a range as we are going to find in the forex market. The range can take the form of a triangle or even a head and shoulders pattern as well.
Figure 1. Range
2. Wait for the price to breakout and stay outside the pattern for at least 3 or 4 bars.
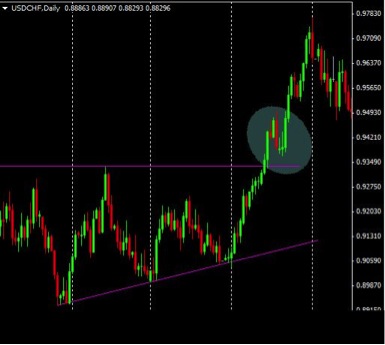
The real goal here is to make sure the price has actually broken out. In order for a breakout to be legitimate it needs to actually move out of the range a decent distance (this is subjective, and the actual pip amount it needs to breakout will vary by time frame and volatility) and stay outside for several bars. Figure 2 shows the type of move outside the range we are looking for.
Figure 2. Range Break
3. Wait for a Pullback to the Breakout Area and Enter a Trade.
In figure 2 the breakout was to the upside, therefore we are waiting for a pullback to the former resistance area of the range–this is our “goodbye kiss,” because the market is coming back to say goodbye to this area one last time. While occasionally the price will pull all the way back to the resistance area, often it will come up a bit shy (as in figure 2)–it gives it a kiss from a small distance away.
Place an order in advance near the breakout point , or watch for a manual entry where the price gets fairly close to the breakout point and then starts moving in the opposite direction again (in the case of figure 2, back up). Both entry methods are subjective and will likely vary by trader.
4. Place Stops and Targets
Place a stop just inside the pattern, initially about 1/4 of the way into the range. For example if the range is 100 pips wide, your stop is placed about 25 pips from the breakout point. Once the price is showing you a profit, and moving in your direction again for a bar or so, then the stop can be moved to breakeven.
Target is roughly equal to the range distance (I will often reduce this). If the range is 100 pips, look for a target between 75 and 100 pips. This provides a 3 or 4 to 1 reward to risk.
With binary options choose an expiry of at least a few bars (whatever time you are trading on) to allow the price time to move back out of the breakout area, and into the money. Each financial instrument acts differently, so you may wish to look back at former breakouts and see how many bars it took for the price to clear the area. This will aid you in choosing your expiry time.
Pitfalls
The main pitfall is that by waiting for a pullback to the breakout area we may miss trades. Figure 1 showed a beautiful range and breakout, unfortunately the price didn’t pullback to the support area after the breakout, so no trade. I believe this pitfall is offset as we will skip many bad trades as well, and by not focusing on the initial breakout (only the pullback) we are free to spot false breakouts which can also be capitalized on.
Another pitfall is that the strategy can be subjective. The patterns I trade are ones you may not see or want to trade, and vice versa. How far the breakout must travel is also somewhat subjective, and depends on factors such as how big the range is, the time frame and how much confirmation you want.
Entries can be manual or set in advance near the breakout point. Each trader’s entry is likely to vary slightly and will therefore affect overall results. The exit chosen will also vary by trader.